Sunday, July 14, 2013

Tamiya Lunch Box Update 9 - Decals & Chrome

Finally paint is done!!  I was at last able to get a coat of clear gloss enamel on in a layer I was happy with. Not too glossy, but enough to sparkle:

So I was able to start my favorite part, decals. This is the time in the build where I think the model really starts to come alive, and get its personality. 


I had to figure how to poke a hole in the lightning bolt for the rear body mounts and not destroy the decal. Slicing a small cross on the sticker was easy, but it wasn't until I looked at my paintbrush...it has a perfectly tapered handle to slide it in and ease the decal into the cut hole. 


Which gave me a nice, clean mounting hole:

Then I added all the chrome bits:


I have to say that taking the extra time to 'silver' the license plate holder was worth it. I think it adds a touch of class:


Same with the little divider in the front windows:

The only thing that really surprised me is how heavy this body is. I've read a lot of comments about it on several forums, but I wasn't prepared for the sheer mass if this beast. I may pick up the Parma Lexan body for running, and use this one as Lunch Money's display top. 

All in all, I am very happy with how it came out.


Now I can't wait for the milled aluminum body mounts.  I also need to figure out how to protect the body from the clips, as I noted during a test fit they had the potential to gouge the paint. We'll see. 

Friday, July 12, 2013

Project teaser!

So I have a side project that I'll be working on over the next few months. Here are a couple pics to pique your interest:


Stay tuned for more on this project!


Lunch Box Build update 8

Finally....detail paint is done. It's not perfect, but Lunch Money will not be entered in any concours shows, so I can live with the small foibles around the windshield gasket. 


I am pretty happy with how the door handles and marker lights came out. Also, I decided to add a touch to the rear by trimming out the license plate mount in silver. 


Door handle and lock:


And turn signals in the grill:


I'm excited to seal it all in tomorrow with a coat of enamel...maybe I'll get to start decals tomorrow night!

Thursday, July 11, 2013

Vintage RC10 project update - wheels

I received a set of vintage "jelly bean" wheels today...so-called because of the shape of the cutouts. They're a little scratched up, but the tires appear to have decent tread left. Check them out:


Here you can see the scratches around the rim:


And here's a close up of how much tread is left:


Obviously I'll eventually upgrade to ball-bearings if I decide to use these wheels for running. For now though, my intention is to take them apart, scrub the nylon parts, and give them a peroxide bath to whiten them up a bit. Then they may become display wheels.  We'll see!

Tuesday, July 9, 2013

Lunch Box Build Update 7 -- oops!

I spent this past weekend working on the detail paint on Lunch Money, which included door handles, locks, license plate light housing, and those trim pieces on the front windows of vans in between the window proper and those funky little triangles that you could wedge open; these were all painted silver. The side marker lights were painted orange, and the rubber window & windshield gaskets are black...of course. 

All was going well, as seen below: 


That is, until I decided to use Green Frog *house painters* masking tape to mask off the windshield gasket:


I figured since I was hand-painting these detail parts, the masking tape would work ok...wrong!!!  After peeling the mask off I was left with this:


A pretty nasty hack job, if you ask me. I think my 2-year old can apply makeup better.... 

So I picked up some 'real' model masking tape (Pactra) on Monday and decided to mask the inverse of the mistake and try to cover up the bleed-under with spray paint:


After one coat, the mistake was less visible, but still there:


So, lesson learned: use the right materials, no matter how inconvenient it may be! I applied another yellow spray coat tonight, so hopefully one more coat will hide that glaring nastiness. Then I plan on sealing the paint with a coat of clear gloss enamel before getting to my favorite part: decals!!  

Stay tuned!


Tuesday, July 2, 2013

RC10 project

I think I've decided what I'm going to do with the RC10...  I just won a Stealth Transmission on eBay, so I think I'm going to do some mild modifications like drilling out the chassis for the Stealth, and seeing if I can find some white, extended front A-arms. That would keep the spirit of a 'vintage' RC10, but address the two glaring weaknesses that I've learned about in researching this piece of history. 

I'd like to keep the gold & white chassis scheme if possible, as that style looks most vintage to me. I haven't even thought about a paint scheme, but I may bite the bullet and send the body out to a professional (once I actually get a body for it...). 

The next goal is to find some white wide A-arms for the front. And some battery cups, which should also be white. 

Stay tuned!

Lunch Box Build Update 6

Not too much of an update, but I wanted to post about my paint job. I am now on color coat #5. Only one spot became problematic, right below the driver's door on the left front side. I was a tad over zealous there and got a little drip. So, I sanded it out with 800 grit and put another color coat over it tonight. Tomorrow I plan on doing the detail work of the door handles, key locks, side marker lights and the windshield gasket. Then I will spray on an initial clear enamel coat to seal in the color before applying the decals. Prior to finishing the body assembly with all the chrome bits and windows, another 2-3 coats of glossy clear enamel to seal everything in and hopefully give a little protection from scratching. 

So far this has been a wonderful learning experience, especially from the body-finishing perspective. Hopefully you like the way it turns out!


Wednesday, June 26, 2013

Lunch Box Build Update 5 - paint!!

I finally eked out enough time to prep, prime, and lay down the first coat of color on Lunch Money's gorgeous 70's Dodge  can body. I followed Justin Noble's great article "How to paint R/C cars" on RCknowhow.co.uk. 

First I filed off any burrs, high spots & flashing left over from the molding process. Then I sanded the body with 1200 grit Tamiya sandpaper. 

I used Tamiya White Primer and laid down a couple coats, letting each iteration dry for at least 2 hours. The shell then looked like this:


What is really hard to see here is the rough texture left by the primer. After the last primer coat cured for 24 hours, I used some 1200 grit again to smooth out the really rough patches. 

Finally, I got to use the color!!  The manual calls for Tamiya spray paint color TS-16 for the main body color. Apologies for the harsh fluorescent lighting, but I can only paint in my garage...it's too hot anywhere else outside. So the first coat looks like this:


So far, so good, though the cans of paint are so small that I think I need to drop by the LHS tomorrow to pick up at least one more. I'm shooting for 5 coats as more color coats only improve depth and lustre. I plan on wet sanding between coats 1, 2 & 3, and then lacquering everything after final detail paint and decals. 

Stay tuned for the next installment!


Vintage RC10 project - chassis found!

I was checking out some vintage RC10's eBay last night and I came across one that looked like a good specimen for a project. I liked what I saw in the pictures, and the price was reasonable at $75.00:


It's not a 'complete' roller, but it is clean, and almost all the important parts are there. The one thing I'm having a hard time figuring out is the 'version' of this chassis. 

There is a stamp on the rear motor housing, just behind the six-speed transmission, seen below, but I can't make it out as an 'A' or an 'AB' or whatnot. Does anyone have an idea?  I looked on RC10talk.com, but I don't think the ad's pictures show enough detail to determine the correct model. 


The bottom is not drilled for the Stealth Transmission, so I'm pretty sure it's an earlier model, maybe a so-called 'Cadillac' chassis (so named for the address Associated Electrics moved to from their initial Edinger location.)


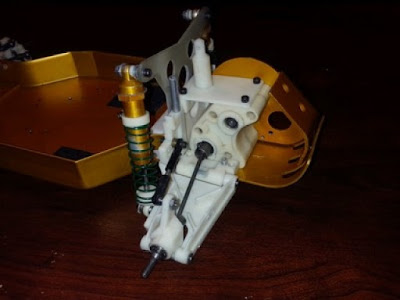
Further, the front suspension arms are of the 'trailing' variety, where the front axle is trailing behind the hinge point.  This is the original, narrow track design. 


I put in a bid and won; I should receive this roller (sans wheels, body & electronics) early next week. Not sure what the project will be; I could still go for a 'full' restoration, a rebuild with more modern parts, or even do a RC10T conversion. Any thoughts on which would be best for this platform??

Stay tuned for a status report and further rebuild/restoration/conversion updates!

Tuesday, June 18, 2013

Non-Vintage Equipment for Lunch Money

Despite the stated goal of this blog to focus on vintage R/C kits, there are a few things that will most definitely NOT be vintage. Namely, the radio, batteries and charging equipment. The idea isn't to break the bank, but I also don't want to skimp. So, what gear am I going to be running?

I just received my Spektrum DX3C, ordered direct from Horizon Hobby.  I ordered online because I had a 15% off code for completing a survey, and I had a free shipping code for Father's Day. However, I was a little concerned when I saw this in my garage:


Which resulted in the radio box looking like this:


Fortunately the lines of the crease marks did not do any damage (as far as I can tell for now), and I now have this transmitter to play with:


I really like the different grip sizes, and have changed out the Medium for the Large. I've also adjusted the steering wheel tension to be a touch lighter than stock. I had to research how to make this adjustment as its not covered in the manual. Turns out its a simple turn of a screw on the underside of the main body, right next to the throttle trigger. 

I chose this radio for the model memory and the fact that I have a micro crawler that uses 2.4 GHz DSM, so I can bind it to this Tx. 

So far all I've done is bind Lunch Money to it:


The other modern tech piece of equipment is the charger. I picked this one up at my LHS for $35:


This is all that was in the box:


That's it, just the charger & manual. It's a simple AC/DC unit but what set it apart for me was that it will charge at up to 4 amps on AC, whereas most budget peak chargers will only do 2A on AC, and if you want anything higher, you have to plug into a DC power source. 

So how does it work?  In a word, fabulously!!  It's super easy: plug in to the wall, plug in battery, select charge rate (default is 1A) using the only button on the unit, then press and hold the button until the LED stays on red. The LED gives the status: solid red = fast charging; flashing green = peak detection charging; solid green = done!  

My only quibble is that, if it charges at up to 4A on AC power, why did Origin choose banana plugs for the DC side of the input instead of alligator clips?  Of course the manual tells you to buy the 'optional' alligator clip set to charge off a car battery, but this should have been included; I would have happily paid the extra $3. 

So what am I using for juice?  So far Duratrax 3000mAH and Dynamite 3300mAH NiMH packs. We'll see how they hold up, but they have to be better than the NiCDs I ran as a kid. I probably won't mess with LiPos until after I've gotten the next project squared away. 

Next installment will hopefully be about prepping, priming, and painting the body.  Stay tuned!

Thursday, June 13, 2013

Lunch Box Build Update 4

Finished the chassis tonite, including the wheels. On the front suspension, I added a ~1/8" piece of tubing on the shock shaft above the chassis mounts to reduce some of the comical angle of the lower arms.

If you look at the box, or search the Internet, it's easy to see how large this angle is; having the front wheels near-horizontal when landing from a wheelie or jump is important. 

Also wanted to show the red, aftermarket Kimbrough servo-saver I have to use, because Hitec servos were not accounted for in the kit's supplied unit. 

Here's a shot of the completed chassis, sans wheels: 
And ready-to-roll:
One thing I am mildly concerned about us how little the max steering deflection appears to be. I'm sure this won't be an issue out in the yard, but I wasn't prepared for the small amount of steering throw. For example, in the pic above, the front wheels are 'cranked over' as far as they'll go!

All that's left now is to paint the body and install the lights. I ordered the Tamiya colors called for in the manual to match the box art, so hopefully I can spend next week painting & applying decals. 

Stay tuned!!

Tuesday, June 11, 2013

How to decide which Lunch Box hop ups to do?

So one of the frustrating things about searching for good resources on hop-ups for the Lunch Box is how internet indexing works.  Basically there is a difference between "Lunchbox" and "Lunch Box"...and its important.  I started out searching for 'Tamiya Lunchbox hop ups OR upgrades', and that gave me one set of links.  Then I tried 'Tamiya Lunch Box hop ups OR upgrades' and that gave me a second, different set of results.  Part of my goal here is to help anyone else out with finding the good resources for articles, how-to's, etc. on vintage R/C cars, whether they be originals or the re-release (so called "re-re") versions.

One of the best resources I've found so far on the Lunch Box is RCknowhow.co.uk.  This site has a wealth of information from a webmaster that *loves* R/C vehicles in general, and Tamiya kits in particular.  I highly suggest checking out his article on "6 Essential Tamiya Lunch Box hop-ups," as it gives a great overview of the simple modifications that you can do to this classic bashing machine to make it handle just a wee bit better.

Anyways, thought I'd share the love, so to speak.  I didn't get to finish the front end of Lunch Money tonight as I was having quite a time with the Horizon Hobby website this evening; I was trying to order a new Spektrum DX3C, which I was finally able to do after figuring out a glitch on their order form.  I also ordered up some Deans Ultra Plugs, as I want to get all the juice out of the NiMH batteries I plan on using, as well as another battery, running at 3500 mAH, which should give me quite a bit longer run time than the old 1500's I used to run as a kid. 

Cheers, and happy bashing!!

More info on the RC10 Classic

I was doing some research on the RC10 Classic kit that's coming out this summer, as I am very excited for the opportunity to own a piece of history.  I came across another R/C site that I haven't read before, MyRCBox.com; they've posted an interview with Associated Electrics on the development of the kit and the marketing research and strategy they used.  Suffice to say, when the company says "limited edition," they mean it...as in a single production run.  That right there is enough for me to contemplate getting two of these kits.  There's also a line in the interview dealing with 'full parts support,' for the Classic version, which is very encouraging!  For more info, check out the interview, linked above.

Monday, June 10, 2013

Lunch Box Build Update 3

Installed the rear shocks, the battery holder and the lower front bulkhead tonight. The shocks really are pogo sticks. But, the system does have some articulation, so hopefully it won't be too bad in the yard.  

Not sure what the little rubber tubing pieces on the shock shafts are supposed to do, other than limit travel so the axle housing doesn't bottom out on the chassis?  There's only about an inch of travel, built as stock. 


Compressed:

The battery holder has a cool loop that flips out to make battery swaps easier:

That little nub fits in a hole on the chassis itself, and is secured with a small clip. Pretty effective and it appears modestly robust. 

Stay tuned for the next update: installing the front A-arms, bumper, and front shocks!